Showing posts with label Green Living. Show all posts

Monday, March 17, 2014

FBP: Cleaning Gone Green

Ever since Everett was born I have been rethinking a lot of the choices that we make around our house, specifically anything having to do with chemicals.  I do not like the idea that some of the products we use have harsh and harmful ingredients that would definitely cause panic if my children got a hold one of them. 
At first I wasn’t sure what to do; I did not want to buy the traditional household cleaners anymore and I also did not want to shell out the big bucks for the green cleaners that I saw on the shelves at the store either.  I was worried that I would spend a ton of money for products that I hadn’t heard of before and could potentially not work.  I did a little bit of research and found that making my own cleaners would not only be cheaper but safer and effective.  Score! 
You don’t have to be fancy when making your cleaners, in fact you can clean most areas around your home with a mixture of one-part vinegar and one-part water.  Vinegar can do some amazing things and the best part about it is that it is non-toxic and it also works as a disinfectant.  If you don’t like the smell of vinegar you can add citrus peels to the mixture, however once the vinegar dries the smell dissipates.  For more tips on cleaning with vinegar, check out this link
Another great item that you can use to clean with is baking soda.  You can mix baking soda and water until it becomes a paste and use it in the kitchen and bathrooms as a scrub to remove soap scum or buildup.  You can also add baking soda to your laundry to help remove stains and add brightness.  Baking soda can also be combined with vinegar (who didn’t love making volcanoes in science class in middle school?!) to create a paste that can be used in on tough stains around the house.   
The two items above (three if you count citrus fruit, four if you count water) you probably already have in your home already. How easyis this?! Grab a spray bottle from the cleaning section at your local superstore and you are in business.  Want to step it up a bit? While you’re in the cleaning aisle look for liquid castile soap- my personal favorite is Dr. Bronner’s Lavender.  This soap is amazing and can be used for so many different purposes!  I was going to type up my own list but I found this one on their website that covers more than I even realized: “You can use Dr. Bronner’s soaps for washing your face, body, hands and hair, for bathing, shaving, brushing your teeth, rinsing fruit, aromatherapy, washing dishes by hand, doing laundry, mopping floors, all-purpose cleaning, washing windows, scrubbing toilets, washing dogs, controlling dust mites, and killing ants and aphids.”  (Found here.)  We use the lavender scented soap as body wash and hand soap at home (check out this dilution chart for instructions) and it smells lovely!  This is a product that you will want to have on hand all the time because it is so versatile!    
Now that you’ve got your household cleaner made what about the floors?  You certainly can use some of the suggestions above however once a year it is important to have your carpets, rugs, tile, and upholstered furniture professionally cleaned.  Day after day at your home your dead skin cell particles shed from your body and embed into the soft surfaces like couches, carpets, and rugs.  If you have pets their hair (along with your own hair) is left in your carpets along with any spilled food or accidents that your children or animals might have had!  The daily traffic going in and out of your home can also bring in dirt and germs that can leave stains and be potentially harmful to the health and well-being of your family. Vacuuming will help to remove some of that buildup but it will definitely not remove all of it. 
Traditional carpet cleaning uses hot water mixed with soaps containing various chemical agents that leave your carpets heavily saturated with harsh residue.  I am excited to have found Zerorez of Greater Fredericksburg, a carpet cleaning company that is able to clean carpets, upholstery, and tiled surfaces better than traditional carpet cleaning companies but without the use of high-residue soaps, detergents, shampoos or chemicals. “Zerorez cleaning services are based on its unique Empowered Water technology. Empowered Water is enhanced water that is electrolyzed and oxidized to create a powerful cleaning solution without harmful toxins or chemicals.” (Found here.)
Zerorez.jpg
When Aaron, the technician, came to  my house he was very friendly and knowledgable.  He took the time to explain how the Zerorez system worked and answered my questions. While he was in my home he was careful to protect the walls and provided great customer service.  The areas of my home that he cleaned had such amazing results that I can’t keep from telling everyone about their services!  Zerorez of Greater Fredericksburg is extending an offer to all of my readers of 10% off any service and one free area!  Be sure to mention “Not So Average Momma” when booking your service!
_ _ _ _ _ _ _ _ _ _ _ _ _ _ _ _ _ _ _ _ _ _ _ _ _ _
Have you liked my Facebook page yet? Please do!
This post was sponsored by Zerorez of Greater Fredericksburg, all content and opinons are my own.
This post originally appeared on Not So Average Momma on Fredericksburg Parent.net

Saturday, September 14, 2013

Weekend Links

A couple of links this weekend... 


So beautiful!
I love (most) tattoos and learning about their meanings. Check out my best friend, Jessica's amazing tattoo and read the story behind it here! Be sure to peruse around her blog too! 

If you are a breastfeeding or pumping mom and are traveling through Vermont, be sure to check out the airports Lactation Station!

If you thought the Smart Car was little, check out this teeny car!

Think you can't garden in your small space? Check out these urban garden ideas!

Fall is almost here and that means we will be gearing up for our annual trip to the Graves Mountain Apple Festival soon!  Have any of you been?  I highly recommend it! 


Could you live without your smart phone? Check out what bold move this family is taking...

 
The video above reminds me about a post titled Distractions, that I wrote for my Fredericksburg Parent blog.

Thursday, September 20, 2012

Nap Time Craft Time: Full Size Unpaper Towels

Welcome to Nap Time Craft Time! Shhh, don't wake the kiddos!  These posts feature a craft that is so easy you can complete this project during nap time! This project can also most likely be completed with items you already have at home! Simple, cute, and free?! I know, awesome right!
------------------------------------------------------------------------------
Last week I posted Easy DIY Cloth Wipes/Unpaper Towels and this week I am posting a more in-depth way to make full size Unpaper Towels. 

Here's what you'll need: 
  • Sewing machine
  • Thread
  • 2 yards of flannel
  • 2 yards of 100% cotton
  • Scissors
Here's what you'll do: 
  • First you will want to prewash your fabrics BUT before you do I would suggest sewing a zig zag stitch down the raw edges so that the fabric wont unravel in the wash.  
    • It is important to prewash so that any shrinkage will happen prior to you sewing your unpaper towels.
  • After you have washed and dried your fabric you can get started! Decide how large your want your unpaper towels to be, you can either use an actual paper towel as a template OR you can make your own out of cardboard or plastic.  

  
  • Now, trace out all of your paper towels using a washable marker, pen, or chalk. Make sure to measure out your fabric first to ensure that you can get the most out of it.  You should be able to get at least 18 unpaper towels. 
    • NOTE: if you plan on turning and topstitching your unpaper towels you will want to give yourself an extra 1/4" or so.
      • Turning and topstitching means that you sew the fabric together (wrong sides together) leaving an opening. Then you pull the fabric through the opening (thus, “turning it”) and then you sew all the way around the project again, sewing the opening shut.

  • Now take one piece of your cotton material and one piece of your flannel and place them with the WRONG sides together (i.e. the fabric that you want to show should be facing out.)
  • Begin sewing around the perimeter using a zig zag stitch.  You will want to sew right on the edge of your fabric so that you get both pieces together.
  • You will need to sew completely around the unpaper towel at least twice. Some of the material may fray but by using a zig zag stitch you wont have to worry about it completely unraveling.
    • NOTE: If you are turning and top stitching you will place the RIGHT sides together and use a straight stitch with a 1/4" seam allowance leaving a small gap, then turn the unpaper towel inside out and topsitich around the perimeter ensuring that you sew the gap closed. 

That's it folks! Now you have a nice batch of unpaper towels! 

Friday, September 14, 2012

Nap Time Craft Time: Easy DIY Cloth Wipes/Unpaper Towels


Welcome to Nap Time Craft Time! Shhh, don't wake the kiddos!  These posts feature a craft that is so easy you can complete this project during nap time! This project can also most likely be completed with items you already have at home! Simple, cute, and free?! I know, awesome right! 
------------------------------------------------------------------------------
Those of you who have kiddos know that you can go through baby wipes and paper towels very quickly, like use a whole roll in a day quickly.  All of those baby wipes and paper towel purchases can really add up and you end up throwing them away! Have you ever thought about that? You buy these products just to throw them away!  There is a better way people!  

My friend Vivid (make sure to check out her blog here) introduced me to the idea of cloth wipes.  At first I did not like the idea of using a cloth wipe to wipe Everett,  it just seemed weird to me; but then I got to thinking that I already use cloth diapers and a few years ago I would have though that was odd too! Basically, I keep the wipe warmer about half way full of water with some coconut oil in it and I just dip and wring out the wipes in it when I change Everett's diapers.  Confession: I only use cloth wipes on E when he pees and save the baby wipes for the poo (when he doesn't go on the potty.) 

Vivid also told me about using unpaper towels in the kitchen and around the house rather than regular paper towels.  You can use them for EVERYTHING  that you already use regular paper towels with and then you throw them in the wash.  Get this- Vivid and her family have gone one whole year without using paper towel! Amazing for the environment and your wallet. 

There are more professional versions of cloth wipes (like these, these, and these) and unpaper towels (like these which are actually made by my friend Sabrina, check out her store here) that you can purchase or if you have a few items at home you can make your own. 

Here's what you'll need: 
  • Sewing machine
  • Thread
  • Receiving blanket(s), flannel, or any absorbent material 
  • Scissors
Here's what you'll do: 

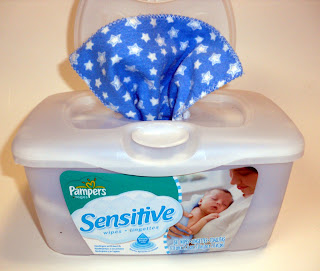
  • First you will need to decide what size you want to make. I made my cloth wipes and unpaper towels the same size however you can really make these as big or small as you want them.  I wanted mine to fit into my old wipes container so I made them 8"x8"
  • Cut out as many wipes as you want! I cut mine 16"x8" and then folded them in half so that they would be "two ply" thick.  You could also cut two 8"x8" pieces and then attach them together. 
    • Helpful tip: If you want yours to be a standard paper towel size, use a paper towel and trace around it.

  • Next, fold over your fabric (or place the two pieces together) with the right sides facing OUT


  • Now use a zig zag stitch (or serge) along the entire perimeter of the fabric, including the fold.  It is important to stitch over the fold because it will help the cloth wipes/unpaper towels to keep their shape. 
  • That is it folks, you are ready to use them! 

I have my unpaper towels folded so that they will "pop up" out of the wipe container and I have it sitting right next to the sink. Check out a tutorial for how to fold your cloth wipes/unpaper towels here
 
So that's it! What do you think? Easy huh?