Saturday, September 29, 2012

Moving Day

Sorry for the lack of postage yesterday, we were super busy getting ready for our move!

Today was moving day and despite me having a migrane and an upper respitory infection, everything was moves successfully!  More to come!

Wednesday, September 26, 2012

Mouth Watering Wednesday: My Favorite Paleo Pancakes

Welcome to Mouth Watering Wednesday! Spice up your life and try a new recipe! This week I am sharing my favorite paleo pancake recipe.  I have tried a lot of different pancake recipes and they are either too egg-y or too banana-ish!  This recipe is from The Nourishing Home and I suggest you all try it! 

Fluffy Little Almond Flour Pancakes

 Yield: 20 silver dollar size pancakes
Ingredients
  • 1 1/2 cups blanched almond flour
  • 1/2 tsp baking soda
  • 1/4 tsp sea salt
  • 3 large eggs, room temperature
  • 1/4 cup organic cultured buttermilk
  • 1 tbsp butter, melted
  • 1 tbsp pure maple syrup
  • 1 tsp pure vanilla extract
Instructions
  1. Preheat griddle over medium heat.
  2. In a small bowl combine the blanched almond flour, baking soda and salt.
  3. Next, separate the egg whites from the yolks. Place the egg whites in a medium bowl; set aside.
  4. Place the egg yolks in a large bowl and whisk in the melted butter. (Be sure the melted butter has cooled to touch before adding, otherwise you may end up with some cooked egg-yolk bits.) Next, whisk in the buttermilk, maple syrup and vanilla.
  5. Then, add the dry mixture to the egg yolk mixture, whisking well to thoroughly combine, making sure there are no lumps in the batter.
  6. Using a clean large wire whisk, whisk the egg whites rapidly until very foamy (about two minutes).
  7. Then, use the whisk to fold the whipped egg whites into the batter; by gently turning the batter over and over again, until well combined.
  8. Grease preheated griddle with butter (or coconut oil).
  9. Ladle a spoonful of batter onto the griddle to form a silver dollar size pancake (about 3” in diameter).
  10. Cook for a few minutes, until pancakes begin to dry out at edges and the bottoms are a golden brown. It’s important to keep a careful eye on them as almond flour pancakes burn easily. (I like to take a little peek under one of the pancakes to check, before flipping.)
  11. Carefully flip and cook another few minutes until done, but not over-browned.
  12. Serve hot off the griddle with cultured butter, pure maple syrup and a medley of fresh berries.
Notes
Fabulous Fruity Pancakes: To make fabulous fruity pancakes, do not add fruit directly into the pancake batter. Instead, once you ladle out the batter onto the hot griddle, add a small amount of fresh whole blueberries (or other diced fruit of your choice) to the top of each pancake prior to flipping. This ensures that the pancakes cook through evenly. It's also best to use fresh fruit, since frozen fruit tends to be excessively moist and may result in a soggy pancake.
Substitution: If you're dairy-free, eliminate the butter and substitute the buttermilk with organic unsweetened real coconut milk. For best results, do not use "lite" coconut milk, or coconut milk beverages. (Native Forest brand canned organic unsweetened coconut milk is BPA-free.)
Time Saving Tip: Make a double batch and allow extra pancakes to cool on wire rack. Then place cooled pancakes on baking sheets and place baking sheets in freezer. Once pancakes are frozen, remove from baking sheet and place frozen pancakes in freezer-safe container. Store in freezer for up to one month. No need to thaw, simply reheat frozen pancakes in toaster oven (at 275 degrees) for a quick, healthy breakfast.

Tuesday, September 25, 2012

Work, Work, Work

We have been super busy over at the new house getting it ready for the big move this weekend. Here's what we have been up to...

Saturday:
Tyler and his uncle cut a pass through in the wall between the kitchen and dining room
I painted the playroom
Sunday:
Tyler and my dad worked outside all day, trimming the bushes, mowing, weed eating, and power washing
My mom and I took turns watching Everett and cleaning the house while my friend Lisa started the mural in the playroom
Monday:
Tonya, Sonja, Anne, and I started painting the house- Tonya painted the ceilings in the house, Anne rolled the paint on the walls, and Sonja and I taped and cut in the edges.
My mom graciously watched Everett and Lilly in the playroom while we were painting.
We also had the gas turned on today.
Tuesday:
My mom, Tonya, Sonja, and Anne met up at the house this morning and have been painting the walls all day. Tonya is working on "mudding" the walls in the kitchen and hall bathroom.
We also had the carpet in the master replaced today.
I stayed home sick today. :-(
Wednesday:
The girls will be back at the house finishing up the painting tomorrow (THANK YOU!) and the driveway is being sealed.
Thursday:
We are having a cleaning service come in to deep clean the kitchen. My mom just told me today that she and my dad are having them clean the rest of the house for us. Thanks guys! :)

So lots of work is happening over at the new place in prep for the move. Pictures will be up soon!

Saturday, September 22, 2012

Letters to Everett: 9/22/12

Everett, 

Wow baby!  You are growing so fast! I know that I say that every time but you really are! You are really showing your personality these days and it is so neat to see you learn new things.  You are great at sharing and enjoy playing with all of your friends. 
Momma and Daddy bought a house this month and we are really excited for you to grow up there!  You are going to have a pretty cool playroom to play in and plenty of backyard to explore. 
This month you have been trying to talk more but mostly what comes out is "ehhhhh urrr ahhh."  We are still trying to figure out how to communicate but luckily you know some signs which help us a lot! 
I love every minute with you and I am so glad that I get to spend every single day with you.  I love you so much!  

Here's what you have been up to this past month:

8/25/12: Momma spotted your first freckle
8/29/12: You found Momma's tattoos today and tried to pull them off, today was the first day that you had peanut butter
8/31/12: You learned how to spin in a circle today
9/02/12: You started dancing today
9/10/12: You started head banging today

Words you Say

  • Daa-eee (Daddy)
  • Daaag (Dog)
  • Mommmma
  • Bec (Becca)
  • Tyler
  • Rara (Laura)
  • Hi
  • This
  • Yay
  • Go
  • Mine
  • No
  • Pa pa (Pig Paw and Paw Paw)
  • Dumb
  • Got it
  • Did it
  • Mowg (Mowgli)
  • Uh oh!
Signs you Sign
  • All done
  • Arms up
  • Dog
  • Fan
  • More
  • Please
  • Thank you
  • Nurse

Momma and Daddy love you to the moon and all the way back! 

xoxo,
Momma

Around the Nest: Playroom- Paint's Going Up!

Welcome to the new playroom... errr well the in progress playroom! I have big plans for this room and we are hoping to get most of the to-do list crossed off before we move in. 

Here is what the playroom looked like before any changes or improvements were done: 
Here is the to-do list for the playroom: 
  • Dr. Seuss mural
    • Paint the background
    • Paint the characters 
  • Create a book nook out of the closet
    • Take the closet door off the hinges
    • Add "bookshelves" 
    • Add curtain and tie back
    • Add some sort of seating (bean bag chair, etc)
  • Move in all the "stuff"
    • Futon
    • Changing table
    • Organizing shelf
    • Toys
    • Rugs
Not a large to-do list but it will take some effort to get it all done before the move in date. Today while Everett was playing at a friends house (thanks again Jana) I painted the background of the playroom.  I can't wait to see all of the characters up on the wall, my good friend Lisa is coming over tomorrow to paint them! 

Here's what the playroom looks like with the background (note: I didn't cut in the ceiling or around the tops of the windows because I forgot to bring a ladder!) 


Stay tuned for more fun! 

Thursday, September 20, 2012

Nap Time Craft Time: Full Size Unpaper Towels

Welcome to Nap Time Craft Time! Shhh, don't wake the kiddos!  These posts feature a craft that is so easy you can complete this project during nap time! This project can also most likely be completed with items you already have at home! Simple, cute, and free?! I know, awesome right!
------------------------------------------------------------------------------
Last week I posted Easy DIY Cloth Wipes/Unpaper Towels and this week I am posting a more in-depth way to make full size Unpaper Towels. 

Here's what you'll need: 
  • Sewing machine
  • Thread
  • 2 yards of flannel
  • 2 yards of 100% cotton
  • Scissors
Here's what you'll do: 
  • First you will want to prewash your fabrics BUT before you do I would suggest sewing a zig zag stitch down the raw edges so that the fabric wont unravel in the wash.  
    • It is important to prewash so that any shrinkage will happen prior to you sewing your unpaper towels.
  • After you have washed and dried your fabric you can get started! Decide how large your want your unpaper towels to be, you can either use an actual paper towel as a template OR you can make your own out of cardboard or plastic.  

  
  • Now, trace out all of your paper towels using a washable marker, pen, or chalk. Make sure to measure out your fabric first to ensure that you can get the most out of it.  You should be able to get at least 18 unpaper towels. 
    • NOTE: if you plan on turning and topstitching your unpaper towels you will want to give yourself an extra 1/4" or so.
      • Turning and topstitching means that you sew the fabric together (wrong sides together) leaving an opening. Then you pull the fabric through the opening (thus, “turning it”) and then you sew all the way around the project again, sewing the opening shut.

  • Now take one piece of your cotton material and one piece of your flannel and place them with the WRONG sides together (i.e. the fabric that you want to show should be facing out.)
  • Begin sewing around the perimeter using a zig zag stitch.  You will want to sew right on the edge of your fabric so that you get both pieces together.
  • You will need to sew completely around the unpaper towel at least twice. Some of the material may fray but by using a zig zag stitch you wont have to worry about it completely unraveling.
    • NOTE: If you are turning and top stitching you will place the RIGHT sides together and use a straight stitch with a 1/4" seam allowance leaving a small gap, then turn the unpaper towel inside out and topsitich around the perimeter ensuring that you sew the gap closed. 

That's it folks! Now you have a nice batch of unpaper towels! 

Secret, Secret, I Got a Secret!

Tyler and I have been keeping a little secret!  We didn't want to post anything on the blog until everything was final because we didn't want to jinx anything BUT... we bought a house!  We are really excited and have already started making it ours.  
Tyler signing the paperwork
We are currently living in the basement apartment of my parents house (which we love) but over the summer we realized that it was time to start looking for a house of our own.  Interest rates are at an all time low right now and thanks to Mr. Dave Ramsey, we have been preparing ourselves financially for the past four years (yes FOUR years) to buy a house.  We have been scrimping and saving and paying off debt to get to this point and it has paid off!  Trust me, we still have a good ways to go to be truly financially free. 
Me signing the paperwork.. look at Tyler's face!
So we started searching for homes in our desired area and found a few that we liked, loved, and had to have but one home stuck out above the rest.  We went to settlement on the house yesterday and we are now proud homeowners! 
Here is our new home!
It definitely a turn-key house and we could have moved in yesterday if we wanted to however, we are planning on doing some "fixing up" before we fully move everything over.  We plan on painting every wall in the house, taking down some outdated spindles, possibly adding a "pass through" (aka whole in the wall), and doing some good cleaning.  So we headed over to the new house yesterday to get started! 
Everett exploring around the house
We ate our first "meal" at the house yesterday... Chipotle!  Everett loves it! 

Tyler worked outside on the driveway, pulling up weeds and prepping it for sealing (which he and my dad will be doing on Sunday.)  It was so nice outside so we opened all the windows up, it seemed like some of them hadn't been opened in a looooong time.  After we got them open it was apparent that they needed a good cleaning so I grabbed a sponge and some warm water and got to work.  
Everett looking outside! "Daddy!"
Stay tuned for a full walk through of the new house complete with our "to-do" list for each room!  Can't wait to share all the pictures!
Even Mowgli loves the new house!

Wednesday, September 19, 2012

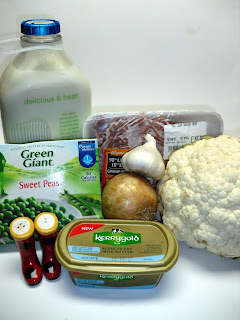
Mouth Watering Wednesday: Shepherds Pie, Paleo Style

Welcome to Mouth Watering Wednesday! Spice up your life and try a new recipe! This week I am sharing one of our staple recipes, one of the ones that we make a few times a month.  It is something that you can make ahead and freeze, take to someone's house or church for potluck, etc. 

Here's what you'll need: 

  • 1 lb of ground beef (or your meat of choice)
  • 1 package of frozen peas
  • 1 head of cauliflower
  • milk
  • butter
  • 1/2 a sweet onion- diced
  • garlic- minced (or garlic seasoning) 
  • salt and pepper
  • A1 or Worcestershire sauce
Here's what you'll do: 
  • Steam and puree your cauliflower
  • While mixing the cauliflower, add minced garlic, salt, and pepper 
  • Next, brown up your meat with the onions, A1 and/or Worcestershire sauce
  • Cook your peas
  • After meat has cooked layer it on the bottom of your baking dish and then add the peas


  • Add the creamed cauliflower to your meat and peas
  • Finally, bake for 20 minutes at 350 degrees 

There you have it folks! As always, if you make it let me know how it goes! 

Tuesday, September 18, 2012

Everett's Birth Story

Everett was due on May 23, 2011 and we anxiously awaited his arrival! When I went for my weekly check up my doctor said that she would like to induce labor because she thought that little Everett might not end up being so little so Tyler and I agreed for me to be induced that Friday.  This was before I was crunchy and I really didn't know all of the risks that went along with induction. I wish that I had done more research prior to agreeing to induce labor. 

They induced me on Friday, May 20th at 7am with pitocin.  When I came in I was only 1cm and maybe 35% effaced.  They left me on pitocin all day (until 6pm) with no changes at all even though I was having steady contractions.  The doctor decided to take me off of everything that night and start with pitocin again in the morning.  At this point I should have know that he wasn't ready to come out but I guess I figured since I was already at the hospital I might as well continue on.  When I was hooked up to the pitocin, the only time I could get out of bed was to go to the bathroom or to sit on the bouncy ball.  

I started the pitocin again Saturday morning around 8:30am.  The doctor came to check on me around 10am and I hadn't made any progress.  She decided to use a foley catheter to get things moving.  Once that was inserted in I started feeling the contractions a lot more.  The contractions were steady and about 2 mins apart for most of the day.  

Around 4:30pm the foley catheter came out and I was in a lot of pain (from the contractions) and  asked for fentanyl (through the IV) and managed the pain pretty well with that.  At 7:30pm I was 5cm and asked for the epidural because things were getting very intense.  The epidural was working very well up until around 3am when I started feeling a lot of pressure.  They checked me then and I was 7cm.  Yay progress!

By 4:30am I was really feeling like I needed to push so they checked me and I was 9cm and 90% so they started prepping the room for delivery.   At 5am I told the nurses that I was going to push whether or not the doctor was at the hospital! :)  The nurse checked me and I was at 10cm and 100%!!  She had me do a "test push" to see how far down I could get him- well after 1 push she said that I better stop pushing or I would have the baby before the doctor got there! 

At 5:30am is when they had me really start pushing.  Although I had pushed him into position with the first push, I couldn't get him any further because he was attempting to come out forehead first rather than the crown of his head.  The doctor finally came in around 6:30am and suggested we try the vacuum- so we did.  She only used it for 1 push - just to position him correctly.  After that I was able to push him right out! By 7:30 am he was nursing and content in my arms!   He was born at 7:01am on May 22, 2011 and weighed 6lbs and 12oz. 

Overall it was not a bad experience but I really did learn a lot of things that I will plan on doing differently next time I have a baby.  I really am going to be opposed to being induced unless I am way overdue.  I definitely will not want to use pitocin again because I was not able to deal with the pain the way that my body wanted to (i.e. walking around, sitting in different positions, etc.)  I think that if I were able to get up and move around more I would have been able to hold off on the pain medication a little longer. May 22nd will always be one of my favorite days because it was the day that God blessed me with the most perfect gift, Everett.  

Monday, September 17, 2012

Prepping for Friday

I've got some prep work going on for Friday's Nap Time Craft Time post! Any guesses? Stay tuned!

Sunday, September 16, 2012

Pig Paw is Home

Everett is so excited that his Pig Paw is home! He was out of town for work this week and Everett did not like that! :)

Friday, September 14, 2012

Just to Brag...

While reading one of my favorite blogs, Young House Love yesterday I saw that Sherry posted a cute tutorial that was fast and (almost) free!  She took the cute new Andy Warhol Campbell's Soup cans and turned them into pen/crayon/marker holders for her little girl's art table. So cute! 

At the end of the post Sherry asked: "Any other fast and almost free projects going on this Friday?"  Well yes Sherry, I do!  I was so excited to share my cloth wipes/unpaper towels tutorial!  I didn't think that she would actually look at my blog BUT she did! Check out the screen shot below! 
AHHHHHH! I was so excited when I saw that not only did she write back to my comment but she read my blog! What?!  Has this happened to anyone?  Been tweeted by celebrities or favorite bloggers? 

Nap Time Craft Time: Easy DIY Cloth Wipes/Unpaper Towels


Welcome to Nap Time Craft Time! Shhh, don't wake the kiddos!  These posts feature a craft that is so easy you can complete this project during nap time! This project can also most likely be completed with items you already have at home! Simple, cute, and free?! I know, awesome right! 
------------------------------------------------------------------------------
Those of you who have kiddos know that you can go through baby wipes and paper towels very quickly, like use a whole roll in a day quickly.  All of those baby wipes and paper towel purchases can really add up and you end up throwing them away! Have you ever thought about that? You buy these products just to throw them away!  There is a better way people!  

My friend Vivid (make sure to check out her blog here) introduced me to the idea of cloth wipes.  At first I did not like the idea of using a cloth wipe to wipe Everett,  it just seemed weird to me; but then I got to thinking that I already use cloth diapers and a few years ago I would have though that was odd too! Basically, I keep the wipe warmer about half way full of water with some coconut oil in it and I just dip and wring out the wipes in it when I change Everett's diapers.  Confession: I only use cloth wipes on E when he pees and save the baby wipes for the poo (when he doesn't go on the potty.) 

Vivid also told me about using unpaper towels in the kitchen and around the house rather than regular paper towels.  You can use them for EVERYTHING  that you already use regular paper towels with and then you throw them in the wash.  Get this- Vivid and her family have gone one whole year without using paper towel! Amazing for the environment and your wallet. 

There are more professional versions of cloth wipes (like these, these, and these) and unpaper towels (like these which are actually made by my friend Sabrina, check out her store here) that you can purchase or if you have a few items at home you can make your own. 

Here's what you'll need: 
  • Sewing machine
  • Thread
  • Receiving blanket(s), flannel, or any absorbent material 
  • Scissors
Here's what you'll do: 

  • First you will need to decide what size you want to make. I made my cloth wipes and unpaper towels the same size however you can really make these as big or small as you want them.  I wanted mine to fit into my old wipes container so I made them 8"x8"
  • Cut out as many wipes as you want! I cut mine 16"x8" and then folded them in half so that they would be "two ply" thick.  You could also cut two 8"x8" pieces and then attach them together. 
    • Helpful tip: If you want yours to be a standard paper towel size, use a paper towel and trace around it.

  • Next, fold over your fabric (or place the two pieces together) with the right sides facing OUT


  • Now use a zig zag stitch (or serge) along the entire perimeter of the fabric, including the fold.  It is important to stitch over the fold because it will help the cloth wipes/unpaper towels to keep their shape. 
  • That is it folks, you are ready to use them! 

I have my unpaper towels folded so that they will "pop up" out of the wipe container and I have it sitting right next to the sink. Check out a tutorial for how to fold your cloth wipes/unpaper towels here
 
So that's it! What do you think? Easy huh? 

Thursday, September 13, 2012

Daily Happenings: 09/13/12

Everett and I had a nice day today! We ran an errand this morning and then went with my mom (Gran) to eat at one of our favorite restaurants, Uncle Julio's.
After we got home Everett took a nice long nap which gave me some time to work on some stuff around the house. He did wake up in a pretty crappy mood but he is still feeling crappy and those molars haven't broken through yet! Poor guy! Now we are just hanging out and jamming to E playing the guitar!

Wednesday, September 12, 2012

Mouth Watering Wednesday: Egg Casserole

Welcome to Mouth Watering Wednesday! Spice up your life and try a new recipe! This week I am sharing a recipe for an egg casserole that I made this past week for Tyler to take to work every day.  (For another easy to take egg breakfast recipe check out this post!) 

So here's what you'll need: 
  • 12 eggs
  • 1 lb Jimmy Dean (or other) breakfast sausage
  • 1/4 cup diced onion
  • 1/2 cup diced tomato
  • Salt and pepper (to taste)
  • Italian seasonings (to taste)

Here's what you'll do: 
  • First take your onion and your breakfast sausage and get them browning up in a skillet. 


  •  While your meat is cooking get all your eggs cracked open and into a big bowl. 

  • Add the remaining ingredients, to include the onion and breakfast sausage mixture (once you've drained it and it has cooled.) 

  • Grease or butter up your baking dish and poor in your mixture. 


  •  Stick 'er in the oven for 45-50 minutes at 350 degrees. I suggest stirring the casserole around 20 minutes to get anything that is stuck to the sides already! Also, make sure to test it by sticking a fork or tooth pick in the middle of it! 


There you have it folks! It's a pretty easy breakfast to take on the go- just slice it up and take it with you! 

Other modifications you can make: 
  • Add additional veggies
  • Give it a Mexican flare- use a can of green chilies or Rotel
  • Use bacon instead of sausage

Enjoy! Of course, if you make it leave me a comment and let me know how it went! 

Monday, September 10, 2012

Molars Molars Everywhere

As crappy as he feels, he just keeps playing!
Everett is finally getting more teeth which is actually not very exciting because he is in so much pain.  His fevers have been really high and I actually started to get concerned last night so I took him in to the pediatrician just to be sure nothing else was going on.  It turns out my "momma instincts" were right and he is fighting off what looks to be a virus on top of cutting two molars on the top.  

Everett wears an amber necklace which helps his teething pain but we are also giving him ibuprofen to help keep the fever down and ease some of his pain.  Normally, I like to let his body fight off the bad stuff (that is after all why we get fevers) but I know that having a very high fever is not good either! 

The doctor said that it will run it's course and shouldn't last more than another day or so but the teething.. that could take a while.